What it does: Allows you to order a Roofr measurement report for turnaround in as little as 2 hours.
Purpose: Receive a detailed roof report on length measurement, area measurement, pitch and direction, an all structures summary, a detailed diagram and more.
- Receive a reliable roof measurement report delivered quickly, helping you save time, reduce costs, and streamline your workflow.
- Send off accurate and fully complete reports to potential clients.
- Roofr reports can be ordered from anywhere in less than 60 seconds.
Prerequisites:
- A Roofr account
- A complete address of an existing roof
- Payment on file in your Roofr account (your first report is free!)
Available On: All Plans (Pay-as-you-go, Pro, Premium & Elite
How to order a roof measurement report
Step 1: Start your order
- From the Jobs section of your Roofr dashboard, click the ‘New’ button
- Select Report from the dropdown menu

Step 2: Enter the address
- Enter your required address in the pop up window. Addresses will auto-populate from the Google database.
- Ensure the address and zip code are correct before clicking ‘Continue’

Step 3: Confirm the location
- Ensure that the red pin is located squarely on the roof that you need measured. You can click and drag to adjust the location of the pin.
- To add additional structures to your order, click the ‘+ Add Muli-Family Building’ button for additional pins. Learn more about ordering multi-building reports HERE.
- Click ‘Confirm’ when all buildings are tagged correctly.
💡 Pro Tip: Out-buildings like garages and sheds are included in Roofr Reports. There is no need to add additional pins for these types of secondary structures on single property.

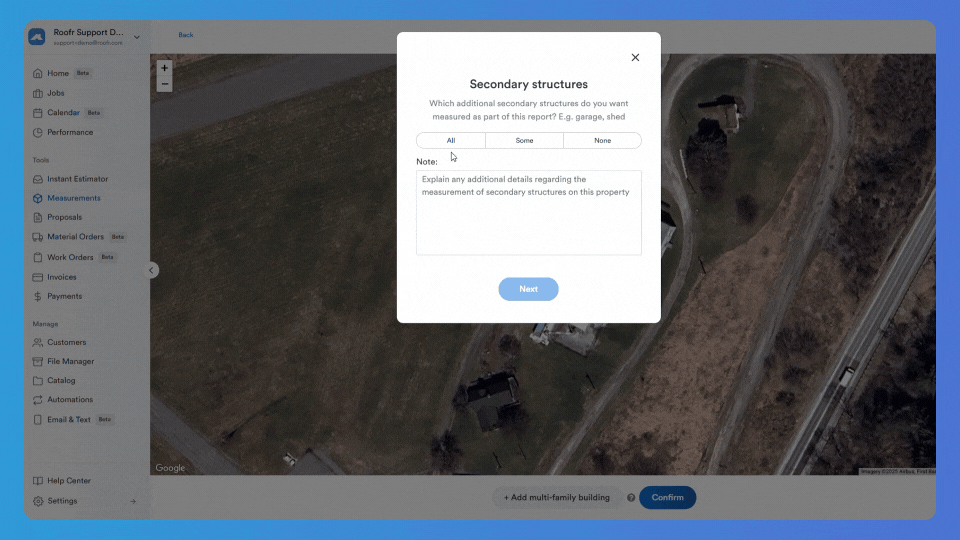
Step 4: Submit Secondary Structure and Notes Requests
- Select if you need ‘All’, ‘Some’ or ‘None’ of the secondary structures on the property included in the report. Secondary structures include garages or sheds associated with the address ordered. If ‘Some’ is selected, you will be prompted to clarify in the notes section.
- The notes section is also the place to include other information that may be required about the property or structure.
- When all the information is entered. Click ‘Next’.
💡 Pro Tip: When ordering a multi-unit (duplex, triplex, etc.), it is useful to put in the notes section whether you require the entire structure or just the unit pinned.
Step 5: Add Extras
- On the confirmation page you can choose to add;
✅ Material Calculations
✅ Waste Recommendations
✅ Faster guaranteed turnaround time
- Click ‘Order report’ to confirm
NOTE: All Roofr subscription plans INCLUDE material calculations and waste recommendations (for shingle roofs)
💡 Pro Tip: Roofr Elite plan includes our fastest report turn around time of 2 Hours!

Find out more about Roofr pricing HERE.
And that’s it!
- Your report request will be sent to our professional design team to complete within your requested turn around time.
👉 Check out more about Roofr Measurement Reports and view a sample report HERE.